Ditch Lights vs Light Bar: Which Fits Your Build?
By Admin
Nov 3, 2026
A dark ranch road can make a stock headlight setup feel real small, real fast. When the trail drops into a wash, turns through tight timber, or throws a sharp corner at your front bumper, the ditch lights vs light bar decision comes down to one thing: where do you actually need to see?
Both upgrades put serious usable light in front of your truck, Jeep, or SUV. But they do different jobs. Buy based on your terrain, driving habits, mounting options, and how you want the finished build to look - not just whichever kit claims the biggest lumen number.
Ditch Lights vs Light Bar: The Real Difference
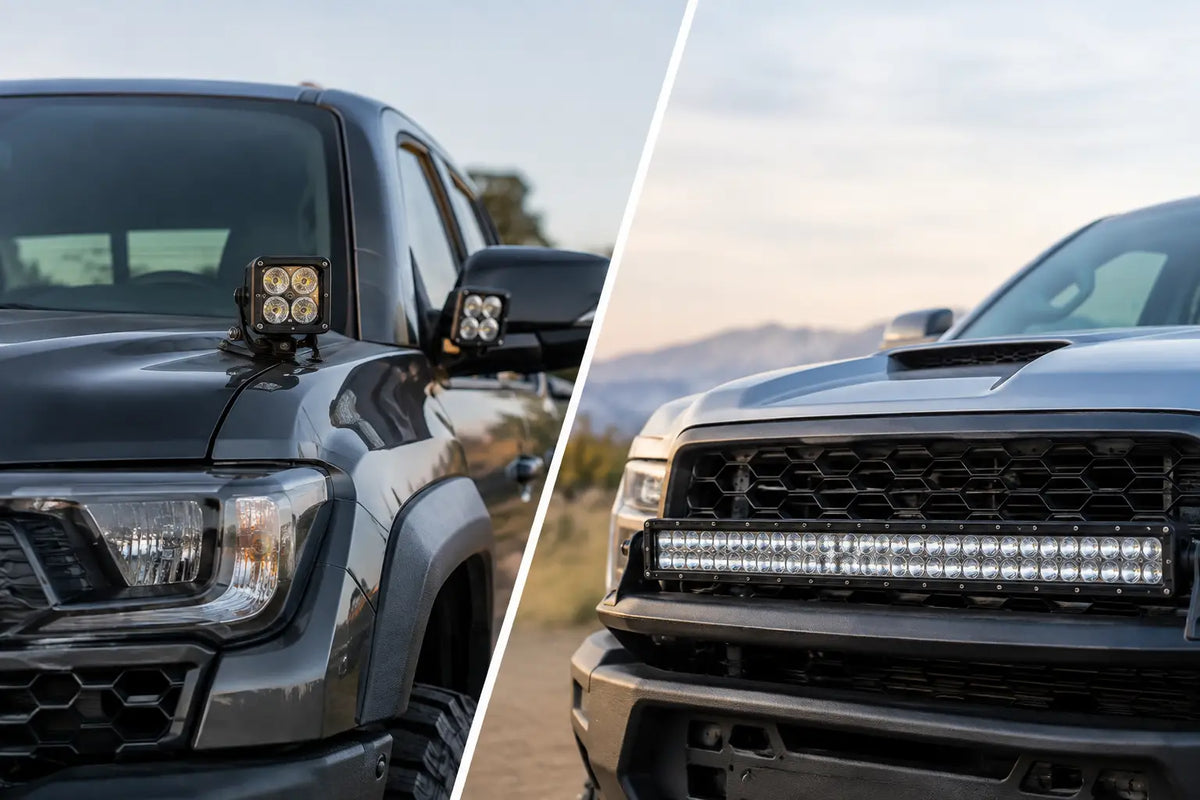
Ditch lights are compact auxiliary pods mounted near the base of the windshield, usually on hood hinges or A-pillar brackets. Their elevated, outboard position lets them throw light toward the shoulders of the trail and into corners. You will also hear them called A-pillar lights, hood lights, or cowl lights.
A light bar is typically mounted low on a bumper, behind a grille, above the windshield, or on a roof rack. It produces a broad wall of forward-facing light. Depending on its beam pattern, a bar can reach far down a two-track, flood the immediate area, or do some of both.
That sounds simple, but placement changes everything. A pair of ditch lights helps you spot the rock sitting just outside your headlight beam. A bumper-mounted bar helps you read the trail farther ahead. A roof-mounted bar can light up a huge area, but it also creates more hood glare, windshield reflection, wind noise, and potential issues in rain, dust, or fog.
When Ditch Lights Earn Their Keep
Ditch lights make the most sense when your trails are tight, technical, and unpredictable. Think wooded trails, narrow ranch tracks, rocky switchbacks, hunting property, camp access roads, and trails where the next turn is hidden by brush. Their job is peripheral illumination.
With the pods aimed slightly outward and down, you can see trail edges, washouts, gates, tree limbs, fence lines, and the terrain beside your front tires. That extra side light is a big deal when you are picking a line at low speed. It also reduces the black-hole effect you get when your headlights point straight ahead while the vehicle is turning.
For a Jeep on 35s crawling through North Texas terrain or a full-size truck working its way down a narrow lease road, ditch lights are often the first lighting upgrade that feels useful every time you wheel at night. They are compact, easy to mount cleanly, and they give a build that aggressive, purpose-built look without covering the front end in hardware.
Aim Matters More Than Raw Output
Do not point ditch lights straight down the road like extra headlights. You will waste their best advantage and risk throwing glare back at yourself. Most setups work best with a modest outward angle and a slight downward tilt. The goal is to fill the dark areas your low beams and driving lights miss, not blind oncoming traffic or light up the clouds.
A wide flood or scene beam is usually the right call for this location. A spot pattern can work on a dedicated off-road rig, but it is rarely the most useful beam pattern for hood-mounted pods.
The Trade-Offs With Ditch Lights
Ditch lights are not a replacement for long-range lighting. Even a high-quality pair of pods cannot match a properly selected driving light bar when you need to see several hundred yards down an open road.
They can also create hood glare if they are aimed too low or mounted too close to the hood surface. On some vehicles, the brackets may slightly affect hood clearance or require attention around antenna mounts and windshield accessories. Buy vehicle-specific brackets when possible. Universal brackets may work, but clean fitment beats making a cheap bracket fit with washers and hope.
When a Light Bar Is the Better Tool
A light bar is built for forward coverage. If you run open desert, wide forest roads, long ranch roads, dunes, or higher-speed trails after dark, a bar puts more usable light where your vehicle will be in the next few seconds.
Bumper-mounted bars are a strong all-around choice. They sit lower than roof bars, which helps reduce windshield reflection and keeps the light closer to the road surface. A slim bar tucked into an aftermarket bumper or behind a grille can look factory-clean while adding a serious amount of output.
A roof bar throws the widest possible field of light from a high mounting position. It can be effective on an overland build, side-by-side support vehicle, or dedicated trail rig. But high-mounted light has real compromises. Dust, rain, snow, fog, and even a dirty windshield can reflect that output back into your eyes. If your truck sees plenty of paved-road miles, a roof bar may be more visual statement than practical daily-use equipment.
Choose the Beam Pattern for How You Drive
A spot beam concentrates light for distance. It fits fast, open terrain where seeing far ahead matters most. A flood beam spreads light over a wide, shorter area. It is useful for slow trail work, camp setup, recovery tasks, and broad peripheral coverage.
Many combo bars use spot optics in the center and flood optics on the outside. That can be a good compromise for mixed use, but combo does not automatically mean better. A focused driving beam in a bumper location may outperform a cheap combo bar with inflated specs. Housing quality, optics, heat management, wiring, and beam control matter far more than a giant advertised lumen number.
The Trade-Offs With Light Bars
Light bars can create a lot of wasted light if they are too large, too high, or poorly aimed. More output is not always more visibility. A 50-inch roof bar may look right on a lifted truck, but it can be overkill for a weekend Jeep that spends most of its time on wooded trails.
Mounting also deserves planning. Bumper and grille installations can involve removing trim, routing wiring through tight spaces, and ensuring the bar does not block airflow, sensors, cameras, or recovery access. Roof installations need solid brackets and careful wire routing so your build does not end up with rattles, leaks, or exposed wiring after the first hard rain.
The Best Setup for Most Off-Road Builds
For a vehicle that sees varied terrain, the strongest answer is often not ditch lights or a light bar. It is ditch lights plus a properly sized, low-mounted light bar.
The bar handles the forward distance and broad trail view. The ditch lights take care of corners, trail shoulders, and obstacles that sit outside the headlight pattern. Together, they make night driving less stressful because your eyes are not constantly trying to interpret darkness beyond the center of the road.
You do not have to buy everything at once. Start with the light that solves your biggest problem. If tight trails and slow-speed wheeling are your normal, start with ditch lights. If you regularly cover open ground at speed or travel long unlit access roads, start with a bumper-mounted driving or combo bar. Add the other later when the build and budget call for it.
Wiring, Switching, and Street Use
Good lights deserve good wiring. Use a harness with appropriately sized wire, relays, fuses, weather-sealed connectors, and a real switch solution. A clean auxiliary switch panel keeps the cab organized and makes it easier to add rock lights, chase lights, air compressors, or more accessories later.
Keep auxiliary lights on their own circuits. Do not tap into factory headlight wiring just because it seems faster. Modern trucks, Jeeps, and SUVs can be sensitive to electrical load and communication systems. A proper harness protects the vehicle and makes troubleshooting much easier when something eventually gets covered in mud, water, or Texas trail dust.
Also, use common sense on public roads. High-output auxiliary lights can blind other drivers and may not be legal for street use in your area. Wire them to a separate switch, aim them responsibly, and cover them when required. Save the full output for the trail, the work site, or the backcountry where it belongs.
Fitment and Placement Before You Buy
Before ordering, look closely at where the lights will live. Check hood clearance, windshield movement, antennas, roof racks, front cameras, parking sensors, grille shutters, and winch access. On a newer truck especially, the cleanest installation is usually the one planned around factory systems instead of forced around them.
For ditch lights, vehicle-specific hood-hinge brackets are worth it. For light bars, match the bar length and mounting style to the bumper, grille opening, or rack you actually have. A light that fits properly, stays secure, and can be serviced later is always better than a bigger light installed as an afterthought.
Build for the terrain you run, not the photo you saw online. The right lighting setup should make your next night trail safer, help you place tires with confidence, and still look like it belongs on your rig.